Painting your helmet is an easy way to express your sense of style and personality. This will make you different from other people so that you just become unique. Painting can transform your piece of safety gear into something more attractive, something you will enjoy wearing. However, you should take precautions before painting your helmet if you don’t want to render it less effective in protecting you. That is why you need to determine if the paint you intend to use is safe, i.e., if it cannot corrode the material of which your helmet is made of.
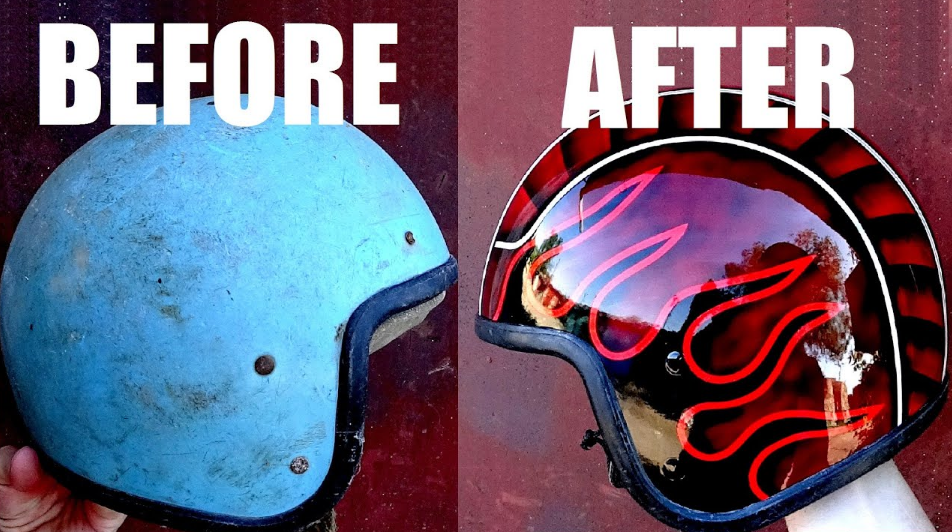
After that, you can now prepare to start decorating your helmet. Customizing your helmet is easy. You don’t even have to be an artist to make your helmet look exactly the way you want it to. You just have to be willing to put in the time and effort to make your DIY project a success. So, if you enjoy being unique, here is a guide on the correct and easy way to paint your helmet. But first, you need to check with the transportation safety office in your locality to confirm if painting your helmet violates any laws.
Follow these steps if you decide to paint your motorcycle helmet:
1. Patience
Before you begin doing the real thing, it is good to give yourself some time to think every step through. Patience will make the overall results better than you expect. But that doesn’t mean that it will be stellar, your painting skills will also count. You will be impressed by what some patience will help you achieve.
2. Clean the helmet and remove key parts
The next step should be to clean your helmet so that you have a good base to work on. The best way to clean your helmet is by using some grease remover. If what you have is a full-face helmet, you will have to remove all the removable fittings that you don’t want to paint. For instance, you have to remove the visor and any pieces attached to Velcro or fasteners.
You can then use masking tape to cover areas that you don’t want to paint but cannot be removed. Some of the areas you will have to cover include the inner shells and vents. Ensure that only the area you want to paint is exposed. The inside of the helmet should be shielded using masking tape and paper or plastic.
Also important to note is that removing the essential parts of the helmet structure, like the inner shell and vents, while painting can weaken the helmet. So, avoid it at all costs.
ALSO READ: Types of Four-Wheelers – ATVs
3. Sandpaper your helmet
This step can be tedious, but it is worth it. Sanding your helmet will make your new paint stick more easily. You might skip this step, it is just that your finished product might not look so good or last longer if you do. However, be careful not to sand off the existing paint as this may inadvertently reach your outer plastic or fiberglass shell, weakening your helmet in the process. To avoid this, use wet sandpaper to sand your helmet then wipe it off using a wet piece of cloth.
4. Make your design on the helmet and apply your paint
Here is now the fun part, where your design comes to life. You can use pencils, stickers, stencils, or tape to make your design. Take as much time as you want to ensure that the design looks just like you imagined.
To enhance the visibility of your design from a distance, you should use thin black lines. You can also make complex geometric patterns by cutting strips of your masking tape and arranging them on the helmet.
After your design, confirm that all the areas that should not be painted are covered, then apply your first coat of paint. Leave it to dry before you can apply the second coat. If you used making tapes in making your design, you can now remove them gently after the paint has dried. This will avoid you from inadvertently ruining your design.
ALSO READ: Budget Rent-A-Car and Reviews
5. Add that clear coat
Once everything is dry, you can apply about 3 to 4 layers of clear coats; allowing time for a coat to dry before you add another. This will help protect the newly applied paint on your helmet, increasing its durability. It also gives your helmet a glossy finish you may want.
Give your final clear coat enough time to dry. You can then reassemble your helmet, reattaching all the components you remove had removed earlier.
With all that, you will now have your helmet modified to your taste. Whichever way it turns out, it’s your work, and that counts! Enjoy the ride with your helmet.


Leave a Reply